At Just Add Ink, we're incredibly lucky to have an awesome Design Team. They're all super-talented and put an amazing amount of effort into their work. And this week we've pulled out all the stops to bring you our first ever Blog Hop!
Before I get into my post, here are a few details about what's happening... There are 10 stops on our Blog Hop (Just Add Ink and each of our 9 Design Team members), but the hop is set up in a loop so it doesn't matter where you start. All you need to do to follow along is click the blog hop button at the end of each post and you'll be taken to the next stop! The cool part of that is that you can do the Blog Hop whenever you want.
Each week at Just Add Ink, we host a challenge, and this week we've incorporated it into our Blog Hop. So the challenge is for you to Just Add... A Technique From The Blog Hop. Easy! There are 9 fantastic techniques to choose from (with a tutorial to match); the hard part will be making the choice!
Today I'm actually sharing 2 techniques with you because they can be so closely linked. Using A Stamp-A-Ma-Jig and Basic Masking. I hope you enjoy your time on our Blog Hop!
Using A Stamp-A-Ma-Jig
The Stamp-A-Ma-Jig (SAMJ) is a fantastic tool that will help you to line up images perfectly.
You don't need your SAMJ for the first step unless you are trying to get your image in a particular place.
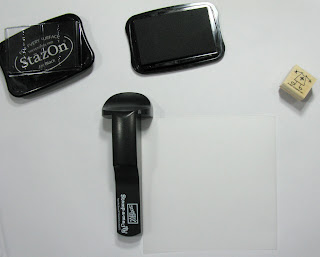 Step Two
 Create your image template
NOTE - I'm using Black StazOn ink because I'm creating a permanent template using plastic. More details about creating a permanent template are at the end of the tutorial.
Don't use StazOn if you want to remove your image once you've finished stamping!
If you do happen to use StazOn and you want to get it off, just use StazOn cleaner - it works a treat!
Line up your pre-inked stamp against the SAMJ above the imaging sheet.
Smoothly lower your stamp onto the imaging sheet, keeping your stamp aligned with the corner of the SAMJ.
Your imaging sheet is ready to go!
Line up your imaging sheet with your first image (see Step One) and hold steady.
This is how your final image will look.
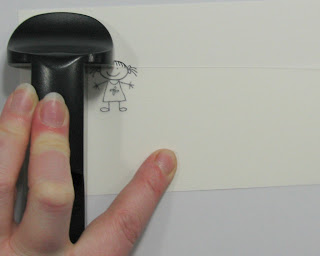 Holding the imaging sheet steady, line up your SAMJ.
TIP - I find it useful to always line up my imaging sheet and my SAMJ in the same way because it reduces the chance of error.
When the imaging sheet is being lined up - I line up the left hand side of the imaging sheet first along the long side of the SAMJ, then slide the imaging sheet up to the top, against the short side of the SAMJ.
When the SAMJ is being lined up - I line up the long side of the SAMJ against the imaging sheet, then, then slide the SAMJ down to line up against the top of the imaging sheet.
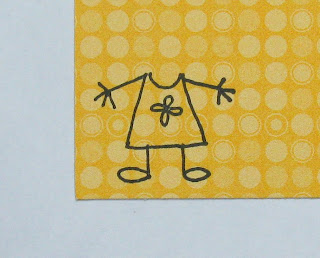 For my ultra-simple cards, I decided to add some Designer Series Paper (DSP) for their clothes.
All you need to do is to stamp your image again on DSP, carefully cut out the portion you need (in this photo, just the dress), and adhere to your final image.
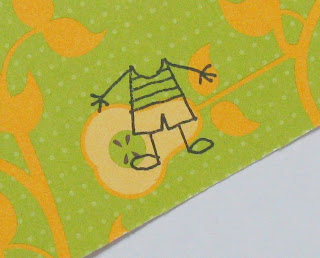 Cleverly using a more largely patterned DSP can solve the problem of your character wearing 2 different items, in this case shorts and a shirt...
The same process can be used to create a large effect with a smaller stamp.
I've used this method for the background of my masked card.
Some other SAMJ examples...
Basic Masking
Masking is a simple and quick technique that can have a really big impact on your work. You'll be able to create overlapping images, creating depth in your images.
You'll need:
Stamp set
Paper/Cardstock
Inks
Post-it notes
Stamp-A-Ma-Jig
I'm using purple Post-it notes so that I can clearly see which images are masked and which aren't.
Cut out your masks - trim as close to the edge as possible.
TIP - trial using your masks on some scrap paper. Depending on the thickness of your masks, you may need to trim the image further.
You've created your masks!
TIP - When you've finished your project, be sure to store your masks away to use again another time. I store mine in the case with the stamps.
The process of stamping with the masks is relatively easy. All you need to do is to place your masks over the images that you want to protect, (that's why you need to make the most of the adhesive backing on the Post-it note!), and then stamp the rest of your images.
Use your SAMJ to position carefully, or be brave and wing it! The sequence of photos below show both approaches and will hopefully give you a good idea of what it's all about!
And here's the final product...
Like I mentioned earlier, I used my SAMJ to create the background effect.


Some more masking examples...
Creating Permanent
SAMJ Templates
A bonus mini-tutorial!
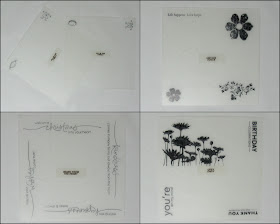
Creating permanent SAMJ templates is easy and they're really handy. Think of your favourite sentiments, or those images that get used time and time again.
All you need is either some sturdy plastic or vellum and your StazOn ink. I use plastic for my templates (frosted binding covers from your office store are perfect) simply because I'm a little heavy handed with my vellum.
All I do is cut the plastic to the same size as my SAMJ imaging sheet (no reason, I just like it that way!) and put a clear plastic label on the middle. I keep all my templates in a small A5 folder so they're all in the one place, although I know people who use vellum and keep each template in with each stamp set. I keep mine all together because I often have 5 or 6 stamp sets open and being used at one time, so it would be a much bigger mess if I had to deal with templates going everywhere too!
And now you're off to see the FABULOUS Amanda Reddicliffe!!
I hope you've enjoyed my stop on our blog hop. I'd love to see your creations in our challenge!
Materials - SAMJ Tutorial
Stamp set - All In The Family
Cardstock - Whisper White, Good Morning Sunshine DSP, Pink Flamingo DSP
Inks - Black StazOn
Accessories - SAMJ
Materials - Masking Tutorial
Stamp set - Vintage Vogue
Cardstock - Old Olive, So Saffron, Whisper White
Inks - Old Olive, So Saffron, Melon Mambo, Versamark
Accessories - Melon Mambo ribbon, Big Shot, Top Note die, SAMJ, Pretties kit, dimensionals, Post-it Notes


Awesome - love the colours on your Card and love your SAMJ Templates...I never thought to use the one Stamp Set on each one and name it....what a great idea. Thanks Chantell
ReplyDeleteIve learnt lots from this Danielle and am off to buy some plastic binding covers!
ReplyDeleteWOW fantastic job.
ReplyDeleteRach:)
Oh wow! I love the Vintage Vogue masking sample. Very pretty. And the templates are a great idea. You are so Martha Stewart with those little labels in the middle. Love it!
ReplyDeleteThanks Danielle, I never thought of using paper for stamp images! I especially love how you made the little boy have a different pattern for his tshirt and shorts!
ReplyDeleteGorgeous cards Dannielle!! And I only have 1 problem... Love the idea of a permanently stamped template - it would really encourage me to use my SAMJ more!
ReplyDeleteLovely! Thanks for the inpsiration!
ReplyDeletealoha, Kim
So much information!!! OMG, I'm totally inspired. Might get some crafting done for a change today. Thanks Danielle!! xx
ReplyDeleteThis comment has been removed by the author.
ReplyDeleteLove your card, the colours are just glorious. Thanks for all the tips.
ReplyDeleteLots of lovely ideas here...now which one to pick??
ReplyDeleteThanks for the very handy tips!! Can't live without my SAMJ, but I have never thought to use it for background patterns, yours look beautiful!
ReplyDeleteLee x
You have some fantastic tips here Dan! Love the one about permanent SAMJ imaging sheets and also the paper piecing using larger print patterns!
ReplyDeleteOh and your masking sample card is STUNNING! They all are!
S x
Fantastic tutorials and beautiful projects, Danielle - so much to take in! Your photography is great (just look at that pink bow!!). Thanks for sharing what you do.
ReplyDeleteAwesome pics and explanations! I love your idea for the permanent SAMJ templates! Thanks!
ReplyDeleteGreat idea for creating permanent SAMJ templates! Thanks for the inspiration.
ReplyDeleteGorgeous ideas and samples Danielle, thanks for all the tips. Love the SAMJ templates never thought of that one will have to try it.
ReplyDeleteWhat a great idea to make up some SAMJ templates! I wish someone had showed me how to use one when I first started stamping!! I used to look at the catalogue and think "What the ..?" I LOVE your photos!! So professional. TFS both techniques. It's good to get back to the basics!!
ReplyDeleteWow! So thats how you use that SAMJ:) thanks for the inspiration!!
ReplyDeleteDon't just love the SAMJ. Your cards are gorgeous. Thanks for sharing.
ReplyDeleteFabulous tips Danielle! Love all your samples! Thanks for sharing. Love Keesh x
ReplyDeleteAbsolutely awesome tutorials and tips and extraordinary cards! Thank you. Ann L
ReplyDeleteThanks so much for the SAMJ tutorial, & the explanation about the permanent templates, need to get some binder covers, oh yeah a SAMJ would be good too!!! TFS. Cheers Donna Zammit
ReplyDeleteOh what a treasure trove of fantabulous facts and handy hints! LOL
ReplyDeleteI love the shorts and t-shirt from the one piece of DSP. How clever is that???
Simone xx
Great cards and projects. Love the tutorial on how to use the SAMJ. And, I really liked the idea of permanent images. Thanks for the tips and for sharing!
ReplyDeleteI've never seen masking done so well! Love your card!
ReplyDeleteThanks, Danielle. Very useful and so well done!
ReplyDeleteBeautiful tutorial & samples Danielle, & amazing photos! TFS. :)
ReplyDeleteOMG!!!!!! I got a bit worried because I used StazOn last night on my SAMJ, anyway, after reading this I ran back to my room and tried to get it off NOoooooooooooo!!!!! it didn't work, aHa but I have StazOn cleaner and Phew it WORKED!!! just letting you know :)
ReplyDelete